
For years the rule was simple: if you want to build a native iOS app, buy a Mac. A MacBook costs more than many students spend in a year, so a lot of good developers never try.
You don't need to own a Mac to build, run and test a native SwiftUI app on your own iPhone. You still need macOS somewhere, because only Apple's toolchain can compile an iOS app. The trick is to rent that macOS for a few minutes in the cloud instead of buying it.
In this guide you'll write the app on Windows, let GitHub Actions compile it on a macOS runner, and install it on your iPhone with Sideloadly. It costs nothing if your repository is public.
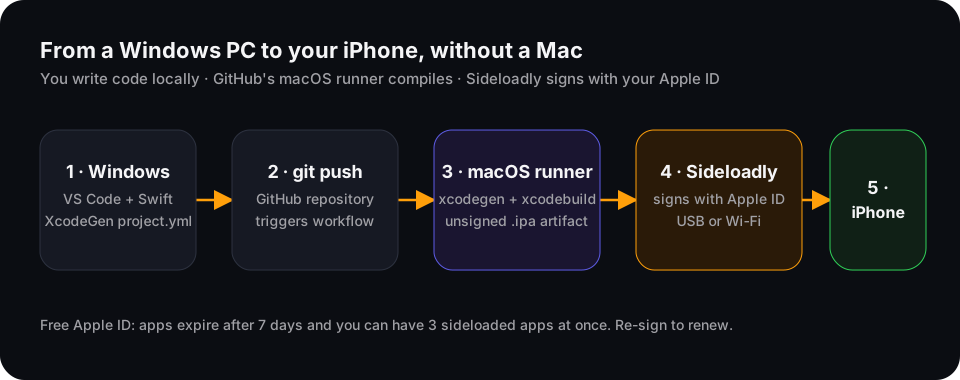
This is part one of two. Part two covers the AWS way: building on AWS CodeBuild, installing over the air from Amazon S3, and testing on real devices with AWS Device Farm.
What this method can and can't do
Be clear about the trade-offs before you start, so nothing surprises you later.
| You can | You can't (without a Mac) |
|---|---|
| Write Swift and SwiftUI code in VS Code on Windows | Use Xcode, SwiftUI Previews or the iOS Simulator locally |
| Compile a real iOS app on GitHub's macOS runners | Publish to the App Store with a free Apple ID |
| Install it on your own iPhone and use the camera, mic and sensors | Keep a free-signed app installed longer than 7 days without re-signing |
Rebuild automatically on every git push | Have more than 3 sideloaded apps at once on a free Apple ID |
The 7-day and 3-app limits come from Apple's free provisioning, not from GitHub or Sideloadly. A paid Apple Developer Program membership removes them and unlocks TestFlight and the App Store.
What you need
| Item | Why | Cost |
|---|---|---|
| Windows 10 or 11 PC | Write code, run Git, run Sideloadly | You have it |
| iPhone on iOS 17 or later | The device you'll install and test on | You have it |
| A GitHub account | Hosts the code and runs the macOS build | Free |
| An Apple ID | Sideloadly uses it to sign the app for your phone | Free |
| Git for Windows | Push code to GitHub | Free |
| VS Code with the Swift extension | Edit Swift with syntax highlighting and code completion | Free |
| iTunes for Windows from apple.com, or the Apple Devices app | Installs the Apple USB drivers Sideloadly needs | Free |
| Sideloadly | Signs the app and installs it on the iPhone | Free |
About GitHub Actions minutes. macOS runners are free and unlimited for public repositories. For private repositories, macOS minutes count at ten times the normal rate against your monthly free minutes, so a free account gets far fewer macOS builds. Keep the repository public while you learn, or watch your usage under Settings → Billing.
Step 1: Create the project on Windows
An iOS app needs an Xcode project. The usual blocker on Windows is the project.pbxproj file inside it: Xcode writes it, and editing it by hand breaks easily.
We'll avoid it entirely with XcodeGen. You describe the app in a short project.yml file, and the macOS runner generates the Xcode project right before it builds. You never touch project.pbxproj, and new Swift files are picked up automatically.
Create this folder structure:
HelloPhone/
├── project.yml                ← describes the app; XcodeGen builds the .xcodeproj from it
├── HelloPhone/
│   ├── HelloPhoneApp.swift    ← app entry point
│   ├── ContentView.swift      ← first screen
│   └── Info.plist             ← app settings and permission texts
└── .github/
    └── workflows/
        └── build-ios.yml      ← the cloud build
project.yml
name: HelloPhone
options:
  bundleIdPrefix: dev.pawanjoshi       # use your own reverse domain
  deploymentTarget:
    iOS: "17.0"
targets:
  HelloPhone:
    type: application
    platform: iOS
    sources: [HelloPhone]
    info:
      path: HelloPhone/Info.plist
      properties:
        CFBundleDisplayName: HelloPhone
        UILaunchScreen: {}
        UISupportedInterfaceOrientations: [UIInterfaceOrientationPortrait]
    settings:
      base:
        PRODUCT_BUNDLE_IDENTIFIER: dev.pawanjoshi.HelloPhone
        MARKETING_VERSION: "1.0"
        CURRENT_PROJECT_VERSION: "1"
        GENERATE_INFOPLIST_FILE: NO
XcodeGen writes Info.plist from the info.properties block, so you only keep one source of truth.
HelloPhoneApp.swift
import SwiftUI

@main
struct HelloPhoneApp: App {
    var body: some Scene {
        WindowGroup {
            ContentView()
        }
    }
}
ContentView.swift
import SwiftUI

struct ContentView: View {
    @State private var taps = 0

    var body: some View {
        VStack(spacing: 24) {
            Image(systemName: "iphone.gen3")
                .font(.system(size: 64))
                .foregroundStyle(.tint)
            Text("Built on Windows")
                .font(.largeTitle.bold())
            Text("Tapped \(taps) times")
                .foregroundStyle(.secondary)
            Button("Tap me") { taps += 1 }
                .buttonStyle(.borderedProminent)
        }
        .padding()
    }
}
Info.plist
Create a minimal file. XcodeGen fills in the properties from project.yml on every build.
<?xml version="1.0" encoding="UTF-8"?>
<!DOCTYPE plist PUBLIC "-//Apple//DTD PLIST 1.0//EN" "http://www.apple.com/DTDs/PropertyList-1.0.dtd">
<plist version="1.0">
<dict/>
</plist>
Step 2: Add the GitHub Actions workflow
This workflow starts a macOS machine, installs XcodeGen, generates the project, compiles an unsigned build for real iPhones, and packages it as an .ipa you can download.
Create .github/workflows/build-ios.yml:
name: Build iOS app

on:
  push:
    branches: [main]
  workflow_dispatch:            # adds a "Run workflow" button in the Actions tab

jobs:
  build:
    runs-on: macos-latest       # a fresh Apple Silicon macOS machine with Xcode installed
    timeout-minutes: 30

    steps:
      - name: Check out the code
        uses: actions/checkout@v4

      - name: Show the Xcode version
        run: xcodebuild -version

      - name: Generate the Xcode project
        run: |
          brew install xcodegen
          xcodegen generate

      - name: Build for iPhone (unsigned)
        run: |
          xcodebuild build \
            -project HelloPhone.xcodeproj \
            -scheme HelloPhone \
            -configuration Release \
            -sdk iphoneos \
            -destination 'generic/platform=iOS' \
            -derivedDataPath build \
            CODE_SIGNING_ALLOWED=NO \
            CODE_SIGNING_REQUIRED=NO \
            CODE_SIGN_IDENTITY=""

      - name: Package as .ipa
        run: |
          mkdir -p Payload
          cp -R build/Build/Products/Release-iphoneos/HelloPhone.app Payload/
          zip -qry HelloPhone.ipa Payload
          ls -lh HelloPhone.ipa

      - name: Upload the .ipa
        uses: actions/upload-artifact@v4
        with:
          name: HelloPhone-ipa
          path: HelloPhone.ipa
          retention-days: 14
Three details matter here:
-sdk iphoneosbuilds for a real iPhone (ARM64), not the simulator.CODE_SIGNING_ALLOWED=NOskips signing on the runner. Sideloadly signs the app later with your Apple ID, so no certificates or secrets live in GitHub.- No
xcode-selectline. Hard-coding an Xcode path breaks when GitHub updates its images. The runner's default Xcode is fine; the second step prints which version you got.
Step 3: Push from Windows
Open a terminal in the HelloPhone folder:
git init
git add -A
git commit -m "First SwiftUI app built from Windows"
git branch -M main
git remote add origin https://github.com/YOUR-USERNAME/HelloPhone.git
git push -u origin main
Create the empty HelloPhone repository on GitHub first (public, so macOS minutes are free).
Step 4: Download the build
- Open your repository on GitHub and click the Actions tab.
- Click the latest Build iOS app run. A first build usually takes a few minutes.
- When every step shows a green tick, scroll to Artifacts and download HelloPhone-ipa.
- Unzip it. You now have
HelloPhone.ipa.
If a step is red, click it to read the log. The errors section below covers the common ones.
Step 5: Install on your iPhone with Sideloadly
- Install iTunes for Windows from apple.com (not the Microsoft Store version) or the Apple Devices app, so Windows has Apple's USB drivers.
- Install Sideloadly from sideloadly.io.
- Connect the iPhone with a cable, unlock it, and tap Trust This Computer.
- Open Sideloadly. Your iPhone appears in the device list.
- Drag
HelloPhone.ipainto the IPA box and enter your Apple ID email. - Click Start and enter your Apple ID password when asked. Sideloadly signs the app with a free development certificate and installs it.
Use an Apple ID you're comfortable signing in with, and turn on two-factor authentication for it.
Step 6: Allow the app to open
The first time, iOS blocks apps from a personal developer account until you allow them.
- Turn on Developer Mode. Settings → Privacy & Security → Developer Mode → On, then restart the iPhone and confirm.
- Trust your developer certificate. Settings → General → VPN & Device Management → your Apple ID → Trust.
- Open HelloPhone from the home screen.
You just ran a native SwiftUI app that you wrote on Windows.
Your daily loop
Once this works, building a new version takes three steps:
- Edit Swift files in VS Code.
git commitandgit push.- Download the new
.ipaand drag it into Sideloadly.
Every 7 days, re-sign the app in Sideloadly to keep it working. Sideloadly can also refresh apps over Wi-Fi when the phone and PC are on the same network.
Adding permissions (camera, microphone, photos)
iOS closes an app the moment it touches the camera, microphone or photo library without a usage description. Add each one you need under info.properties in project.yml:
| Feature | Key | Example text |
|---|---|---|
| Camera | NSCameraUsageDescription | "Used to scan documents." |
| Microphone | NSMicrophoneUsageDescription | "Used to record voice notes." |
| Speech recognition | NSSpeechRecognitionUsageDescription | "Used to transcribe your recordings." |
| Photo library | NSPhotoLibraryUsageDescription | "Used to attach photos." |
| Location while in use | NSLocationWhenInUseUsageDescription | "Used to show nearby events." |
    info:
      path: HelloPhone/Info.plist
      properties:
        NSCameraUsageDescription: "Used to scan documents."
        NSMicrophoneUsageDescription: "Used to record voice notes."
Common errors and fixes
xcodebuild fails with exit code 65. This is almost always a Swift compile error. Open the failed step, search the log for error:, and fix that line. Because you can't compile SwiftUI on Windows, keep each change small so a failed build points to one file.
"Scheme HelloPhone is not currently configured for the build action". The scheme name must match the target name in project.yml. XcodeGen creates a scheme named after each application target.
The artifact is missing or 0 bytes. The .app path is wrong. Add find build -name "*.app" before the package step to print where Xcode put it.
Sideloadly says it can't find the iPhone. Install iTunes from apple.com or the Apple Devices app, unlock the phone, use a data cable, and tap Trust This Computer again.
"Maximum number of apps for free development profiles has been reached". A free Apple ID allows 3 sideloaded apps at once. Delete one you don't need, or use a paid developer account.
The app opens and closes immediately. A permission description is missing (see the table above), or Developer Mode is off.
The app stopped opening after a week. The free certificate expired. Sign and install it again with Sideloadly.
Let an AI coding agent run the loop
The repetitive part is writing code you can't compile locally, pushing it, waiting for the build, and reading errors. A coding agent can do that loop for you. Here's a prompt that works well:
You are an iOS engineer working with me on a SwiftUI app (iOS 17+). I develop on
Windows and cannot run Xcode. The repository uses XcodeGen (project.yml) and a
GitHub Actions workflow (.github/workflows/build-ios.yml) that builds an unsigned
.ipa on macos-latest.

Ask me only for: the repository URL and the change I want.

Then:
1. Read project.yml, Info.plist properties and the Swift sources yourself.
2. Make the change with Swift 5.9+ and iOS 17 APIs (@Observable, async/await).
   Keep views small; split large views into separate files. No TODO placeholders.
3. If the change uses the camera, microphone, photos or location, add the matching
   usage description under info.properties in project.yml.
4. Commit with a clear message and push to main.
5. Watch the workflow run. If a step fails, read the log, fix the cause, push again,
   and repeat until every step is green and the .ipa artifact is larger than 0 bytes.
6. Tell me the run URL and remind me to install the new .ipa with Sideloadly.
What it costs
| Part | Tool | Cost |
|---|---|---|
| Editing code | Windows, VS Code, Git | ₹0 |
| Compiling | GitHub Actions macOS runner, public repository | ₹0 |
| Signing and installing | Free Apple ID and Sideloadly | ₹0 |
| App Store, TestFlight, no 7-day limit | Apple Developer Program | Paid yearly membership |
FAQ
Can I really build iOS apps on Windows without buying a Mac?
Yes. You write Swift on Windows and compile on GitHub's macOS runners. You never own a Mac, but macOS still does the compiling, in the cloud.
Can I see SwiftUI previews on Windows?
No. SwiftUI and the iOS Simulator only run on macOS. You test on your real iPhone instead, which also gives you the real camera, haptics and performance.
Do I need to pay Apple?
Not to run apps on your own iPhone. A free Apple ID works with the 7-day and 3-app limits. You need the paid Apple Developer Program to use TestFlight, distribute to other people, or publish on the App Store.
Is it safe to give Sideloadly my Apple ID?
Sideloadly signs in to Apple to create a development certificate. Many developers use a separate Apple ID for sideloading. Either way, turn on two-factor authentication.
What's next?
Read part two, Build and Ship iOS Apps from Windows with AWS, to build on AWS CodeBuild, install over the air from Amazon S3 without a cable, and test across real iPhones on AWS Device Farm.
Builders build everywhere. If you try this and get stuck, reach out through my contact page. I'm happy to help, and I share what I learn with AWS Student Builder Group GEU.