
In part one we built a SwiftUI app on Windows, compiled it on GitHub's macOS runners, and installed it with Sideloadly. That path is free and perfect for learning.
It has limits once a team is involved. Every tester needs a cable and a PC, free certificates expire every 7 days, and you can only test on the phones you own.
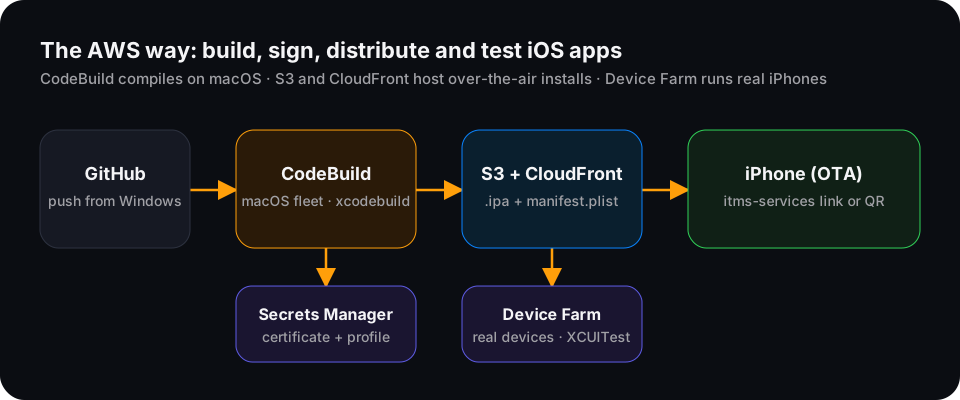
This guide is the AWS way. You still write code on Windows, but AWS compiles, signs, distributes and tests the app:
- AWS CodeBuild compiles on a macOS fleet.
- AWS Secrets Manager holds your signing certificate and provisioning profile.
- Amazon S3 and CloudFront host the build so testers install it over the air from Safari.
- AWS Device Farm runs your app on real iPhones in AWS data centers.
GitHub way or AWS way?
| GitHub way (part one) | AWS way (this guide) | |
|---|---|---|
| Compiles on | GitHub Actions macOS runner | AWS CodeBuild macOS fleet |
| Signing | Sideloadly with a free Apple ID | Your Apple Developer certificate, inside CI |
| Installing | USB or Wi-Fi from a Windows PC | Over the air from a link or QR code |
| Testers | You | Your team, up to Apple's registered-device limit |
| Real-device testing | Your own iPhone | Many iPhone models on AWS Device Farm |
| Cost | Free for public repos | Pay for AWS usage plus Apple Developer Program |
| Best for | Students, hackathons, solo projects | Teams and repeatable release pipelines |
The one thing you must know first: signing
Over-the-air installation only works for signed apps. iOS refuses to install an unsigned .ipa from a link.
For the AWS way you need a paid Apple Developer Program membership. With it you create:
- An Apple Distribution certificate (exported from Keychain as a
.p12file with a password). You can create the signing request on Windows with OpenSSL and download the certificate from the Apple Developer website. - An ad hoc provisioning profile (
.mobileprovision) for your app's bundle ID that lists the UDIDs of every tester's iPhone. Apple limits how many devices you can register each membership year, so this suits teams and test groups, not the public.
When you're ready for a wider audience, switch to TestFlight. The same CodeBuild pipeline can upload builds there instead.
Step 1: Keep the project from part one
Use the same structure: Swift sources, a project.yml for XcodeGen, and your code on GitHub. You still never edit project.pbxproj.
HelloPhone/
├── project.yml
├── HelloPhone/              ← Swift sources
├── ExportOptions.plist      ← tells Xcode how to export the signed .ipa
├── buildspec.yml            ← the CodeBuild build steps
└── ota/
    └── manifest.plist       ← template for over-the-air installs
Step 2: Store signing files in Secrets Manager
Never commit certificates to Git. Store them as secrets and let CodeBuild read them at build time.
Run these from Windows with the AWS CLI. PowerShell's certutil turns the binary files into base64 text first:
certutil -encodehex -f distribution.p12 cert.b64 0x40000001
certutil -encodehex -f HelloPhone_AdHoc.mobileprovision profile.b64 0x40000001

aws secretsmanager create-secret --name ios/signing/p12 --secret-string file://cert.b64
aws secretsmanager create-secret --name ios/signing/p12-password --secret-string "YOUR_P12_PASSWORD"
aws secretsmanager create-secret --name ios/signing/profile --secret-string file://profile.b64
Delete cert.b64 and profile.b64 afterwards.
Step 3: Create the CodeBuild project on a macOS fleet
CodeBuild runs macOS builds on reserved capacity fleets backed by Apple silicon Mac hardware. Fleets bill differently from on-demand Linux builds, so check current CodeBuild pricing before you leave one running.
In the AWS console:
- Open CodeBuild → Compute fleets → Create fleet. Choose the macOS environment type and the current macOS image with the Xcode version you need.
- Open Build projects → Create build project.
- Source: connect your GitHub repository and enable a webhook so pushes to
mainstart a build. - Environment: choose the macOS fleet you created.
- Buildspec: use
buildspec.ymlfrom the repository. - Environment variables: add
DIST_BUCKET(your S3 bucket name) andDIST_URL(your CloudFront URL, for examplehttps://d123example.cloudfront.net). - Service role: allow it to read the three secrets and write to your bucket.
A least-privilege policy for the build role looks like this:
{
  "Version": "2012-10-17",
  "Statement": [
    {
      "Effect": "Allow",
      "Action": "secretsmanager:GetSecretValue",
      "Resource": "arn:aws:secretsmanager:REGION:ACCOUNT_ID:secret:ios/signing/*"
    },
    {
      "Effect": "Allow",
      "Action": ["s3:PutObject"],
      "Resource": "arn:aws:s3:::YOUR_BUCKET/builds/*"
    }
  ]
}
Step 4: Write the buildspec
buildspec.yml creates a temporary keychain, installs your certificate and profile, generates the project, archives a signed build, exports the .ipa, and uploads it with its manifest.
version: 0.2

env:
  secrets-manager:
    P12_B64: ios/signing/p12
    P12_PASSWORD: ios/signing/p12-password
    PROFILE_B64: ios/signing/profile

phases:
  install:
    commands:
      - xcodebuild -version
      - brew install xcodegen

  pre_build:
    commands:
      # Temporary keychain that only lives for this build
      - KEYCHAIN=build.keychain
      - security create-keychain -p "ci" "$KEYCHAIN"
      - security set-keychain-settings -lut 3600 "$KEYCHAIN"
      - security unlock-keychain -p "ci" "$KEYCHAIN"
      - security list-keychains -d user -s "$KEYCHAIN" $(security list-keychains -d user | tr -d '"')
      - echo "$P12_B64" | base64 --decode > dist.p12
      - security import dist.p12 -k "$KEYCHAIN" -P "$P12_PASSWORD" -T /usr/bin/codesign
      - security set-key-partition-list -S apple-tool:,apple: -s -k "ci" "$KEYCHAIN"
      # Install the provisioning profile where Xcode looks for it
      - mkdir -p "$HOME/Library/MobileDevice/Provisioning Profiles"
      - echo "$PROFILE_B64" | base64 --decode > "$HOME/Library/MobileDevice/Provisioning Profiles/adhoc.mobileprovision"
      - xcodegen generate

  build:
    commands:
      - |
        xcodebuild archive \
          -project HelloPhone.xcodeproj \
          -scheme HelloPhone \
          -configuration Release \
          -destination 'generic/platform=iOS' \
          -archivePath build/HelloPhone.xcarchive \
          CODE_SIGN_STYLE=Manual \
          DEVELOPMENT_TEAM=YOUR_TEAM_ID \
          CODE_SIGN_IDENTITY="Apple Distribution" \
          PROVISIONING_PROFILE_SPECIFIER="HelloPhone AdHoc"
      - |
        xcodebuild -exportArchive \
          -archivePath build/HelloPhone.xcarchive \
          -exportOptionsPlist ExportOptions.plist \
          -exportPath build/export

  post_build:
    commands:
      - VERSION="$CODEBUILD_BUILD_NUMBER"
      - sed -e "s#__IPA_URL__#$DIST_URL/builds/$VERSION/HelloPhone.ipa#" -e "s#__VERSION__#1.0.$VERSION#" ota/manifest.plist > build/manifest.plist
      - aws s3 cp build/export/HelloPhone.ipa "s3://$DIST_BUCKET/builds/$VERSION/HelloPhone.ipa"
      - aws s3 cp build/manifest.plist "s3://$DIST_BUCKET/builds/$VERSION/manifest.plist" --content-type text/xml
      - echo "Install link:" "itms-services://?action=download-manifest&url=$DIST_URL/builds/$VERSION/manifest.plist"
      - security delete-keychain "$KEYCHAIN"

artifacts:
  files:
    - build/export/HelloPhone.ipa
Replace YOUR_TEAM_ID with the 10-character Team ID from your Apple Developer account, and HelloPhone AdHoc with your profile's name.
ExportOptions.plist
<?xml version="1.0" encoding="UTF-8"?>
<!DOCTYPE plist PUBLIC "-//Apple//DTD PLIST 1.0//EN" "http://www.apple.com/DTDs/PropertyList-1.0.dtd">
<plist version="1.0">
<dict>
  <key>method</key>
  <string>release-testing</string>
  <key>signingStyle</key>
  <string>manual</string>
  <key>teamID</key>
  <string>YOUR_TEAM_ID</string>
  <key>provisioningProfiles</key>
  <dict>
    <key>dev.pawanjoshi.HelloPhone</key>
    <string>HelloPhone AdHoc</string>
  </dict>
</dict>
</plist>
release-testing is the current name for ad hoc distribution. Older Xcode versions call it ad-hoc.
Step 5: Host over-the-air installs on S3 and CloudFront
iOS only installs over HTTPS with a valid certificate. S3 website endpoints are plain HTTP, so put CloudFront in front of a private bucket:
- Create an S3 bucket and keep Block Public Access on.
- Create a CloudFront distribution with that bucket as the origin and Origin Access Control, so only CloudFront can read it.
- Use the CloudFront domain as
DIST_URL.
ota/manifest.plist
The buildspec fills in the two placeholders on every build.
<?xml version="1.0" encoding="UTF-8"?>
<!DOCTYPE plist PUBLIC "-//Apple//DTD PLIST 1.0//EN" "http://www.apple.com/DTDs/PropertyList-1.0.dtd">
<plist version="1.0">
<dict>
  <key>items</key>
  <array>
    <dict>
      <key>assets</key>
      <array>
        <dict>
          <key>kind</key>
          <string>software-package</string>
          <key>url</key>
          <string>__IPA_URL__</string>
        </dict>
      </array>
      <key>metadata</key>
      <dict>
        <key>bundle-identifier</key>
        <string>dev.pawanjoshi.HelloPhone</string>
        <key>bundle-version</key>
        <string>__VERSION__</string>
        <key>kind</key>
        <string>software</string>
        <key>title</key>
        <string>HelloPhone</string>
      </dict>
    </dict>
  </array>
</dict>
</plist>
Installing
The build log prints a link like:
itms-services://?action=download-manifest&url=https://d123example.cloudfront.net/builds/42/manifest.plistPut it on a simple web page or turn it into a QR code. A tester whose iPhone is in the provisioning profile opens it in Safari, taps Install, and the app appears on the home screen. No cable and no PC.
Who can download it? Anyone with the link can download the file, but only registered devices can install it. If your builds are confidential, protect the CloudFront path with signed URLs or keep the links inside your team.
Step 6: Test on real iPhones with AWS Device Farm
Device Farm gives you real, physical iPhones in AWS data centers. It runs in the us-west-2 (Oregon) region.
- Remote access: start a session, pick an iPhone model, upload your
.ipa, and use the phone from your Windows browser. You can tap, swipe, rotate and read the device logs. - Automated tests: upload the app with an XCUITest bundle or Appium tests and run them on several iPhone models at once. You get videos, screenshots, logs and performance data for each device.
Upload an .ipa built for devices (arm64), like the one from Step 4. Check the current Device Farm documentation for signing requirements if you use private devices.
You can also start a Device Farm run from the buildspec with the aws devicefarm CLI, so every build gets tested automatically.
Optional: connect a serverless backend
Most apps need a backend, and serverless keeps it cheap while you have few users. Two patterns pair well with this pipeline:
- Direct uploads to S3 with presigned URLs. A small Lambda function signs an upload URL, and the app sends the file straight to S3, so large photos never pass through your API.
- AI features with Amazon Bedrock. A Lambda function calls a foundation model through the Bedrock Converse API and returns the result to the app, so no model keys live on the phone.
I walk through building that kind of API in Build a Serverless REST API with AWS Lambda, API Gateway and DynamoDB.
Common errors and fixes
No signing certificate "Apple Distribution" found. The .p12 didn't import into the keychain the build uses. Check the security list-keychains line and that P12_PASSWORD is right.
Provisioning profile doesn't include the currently selected device or install fails on a tester's phone. That iPhone's UDID isn't in the ad hoc profile. Add it in the Apple Developer portal, regenerate the profile, update the secret, and rebuild.
Safari shows "Cannot connect" for the install link. The manifest URL must be HTTPS with a valid certificate. Use the CloudFront domain, not the S3 website endpoint.
The app installs but won't open. The bundle ID in manifest.plist must match PRODUCT_BUNDLE_IDENTIFIER, and the profile must be for that bundle ID.
Builds sit in the queue. Your macOS fleet has no free capacity. Increase the fleet size or wait for the running build.
FAQ
Can I install an unsigned app over the air?
No. iOS only installs signed apps from an itms-services link. Use ad hoc signing for a registered team, or TestFlight for wider testing.
Do I still need a Mac?
No. You write code and manage AWS from Windows. macOS runs in CodeBuild's fleet, and you create certificates through the Apple Developer website.
Which path should a student pick?
Start with the GitHub way. It's free and teaches the whole build process. Move to the AWS way when you have a team, testers without PCs, or need to test on many iPhone models.
If you're building iOS apps on AWS and want feedback on your pipeline, get in touch. I share builds like this with AWS Student Builder Group GEU.